For your second try at using HTML, we're going do something else that Yola can't really do for you: making a table. And we're going to do it all ourselves!
We'll use:
- <table> (the tag for... table)
- <tr> (the tag for table row)
- <td> (the tag for table data)
- <center> (the tag to centre text)
We'll also use a few attributes:
- border="x" (x is a number). This attribute is used after the 'table' start tag to set the thickness of the border.
- colspan="x" (x is a number). This attribute is used after a 'td' start tag to make that data cell go across more than one column - a bit like merging cells in Excel.
- rowspan="x" (x is the number of rows that the data cell will cover). Works the same as 'colspan'.
Here's an example of code for a very basic table:
<table border="1"> <!-- - Starts a table -->
<tr> <!-- - Starts a row -->
<td> 0 </td> <!-- - Adds a data cell to the first row -->
<td> 0 </td> <!-- - Adds another cell to the first row -->
</tr> <!-- - Closes the first row -->
<tr> <!-- -Starts a second row -->
<td colspan="2"> ___ </td> <!-- - Adds a data cell to the second row, and sets it to take up 2 columns -->
</tr> <!-- - Closes the second row -->
</table> <!-- - Closes the table -->
Select the HTML code above, and copy it (Control + C). On your new page ("HTML 2"), add an HTML box (drag the HTML box across from the right onto the webpage), and paste the code into the HTML editor which pops up. When you close it you should see a table.
From the code and the result, you can see that:
- Starting a new data cell (<td>) automatically adds the new one to the right of the previous one
- Starting a new table row (<tr>) automatically adds the new one beneath the previous one
- We need to create the TABLE FIRST, then ROWS within the table, then finally the DATA CELLS within each row.
- Note: the <!-- blah blah --> tag is a 'comment' tag - they're used to make comments/explanations in the HTML code without anything showing up on the webpage.
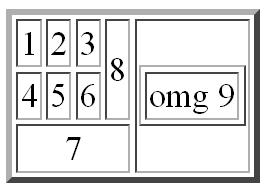
You need to add an HTML box (or just a text box and click on the HTML button) on your "HTML 2" page, and use the tags and attributes above to create the table.
Tips: You'll need to make sure you close every tag you open, and be careful to nest things in the right order (for example, a row is "in" the table, so the row should start and finish "inside" the table code, ie between <table> and </table). Keep your formatting neat, that will make things MUCH easier.
Plan A is NOT to just give up without even reading the instructions properly and then waste time on Facebook or Webtoons instead!
So, see if you can work it out!